Thursday, November 28, 2013

reliable


OK there is no ignoring it now, the growing to do and shopping lists, busy social calendar, it all points to Christmas! I always try and be organised, even planning a few extra gifts to have at hand for those surprise extra guests or last minute invites. Even with all that organising I still sometimes fall short, so it's good to have something reliable in mind for a last minute gift or "bring a plate" emergencies.


Last week I was sent a delicious parcel of goodies from Bakers Delight. Some fruit mince tarts and a Christmas fruit cake. You might remember last year I was lucky enough to try their Christmas cake, but this was my first time trying their fruit mince tarts.


I loved how the tarts had a little foil base, made them look just that bit more special than the supermarket ones, I think they would look sweet in cellophane bags tied with a handmade ornament. They were tasty and full of fruit, they disappeared quickly.


Look at that cake! Argh I wanted to keep it just like that and present it at my Christmas table passing it off as my own, shameless right? But alas in the name of giving a thorough review we cut into it. It was moist! Just how I like a Christmas cake to be, full of currants and sultanas. You can buy a large Christmas cake or Bakers Delight also offer single servings! But why would you just want a little bit? Am I right?

What is your favourite baked treat at Christmas time?


*Just in case you are wondering, Bakers Delight supplied me with a box of fruit mince tarts and one Christmas cake. All the words and photos and opinions are my own. 

Wednesday, November 27, 2013

Yo!


Many years ago I was let in on a little secret, if you freeze bananas then pop them into a blender they whip up into an amazing creamy mixture, a lot like soft serve ice cream. Problem is though, making it is really hard on your blender/food processor. To be honest, although it was a totally delicious, not to mention a super healthy snack option I stopped making it, I was worried I was going to blow up my blender and my food processor too!

Skip forward a decade, and it seems that someone has purpose built a machine for making frozen fruit into delicious ice cream like treats! The machine is called "Yonanas" and I first discovered it's existence on Stella's blog. After I read her review I felt like rushing out to get one, I've got one child who isn't that fussed on fruit, yet turn it into an ice cream and it's a different story. So I thought this could be just the thing to get some more fruit into him. Looking at the machines online and in store I just couldn't bring myself to get one, ah yes, the need verses want dilemma. Not to mention I'd need to find space in my cramped kitchen cupboards for a start! But just as the saying goes, "good things come to those who wait" they did! I spotted a Yonanas machine at my local Salvation Army store, it quickly came home with me.

I can tell you it's been a BIG hit with every one, we've tried out lots of combos. It's a great way to use up our little homegrown strawberries that are a wee bit little. I like the idea of using up the over ripe fruit too, like the kiwifruit that has a soft spot that makes it hard for me to stomach. Once frozen and popped into the freezer it's a different story.The combo pictured above is banana and peanut butter with a wee bit of cocoa and maple syrup. It's a bit of a naughty combo but I was trying to convince my husband of the merits of the machine! I still haven't found it a place in my cupboard, ahem.

Linking in with Max again this week with the op shop show off. 

Tuesday, November 26, 2013

extended


The nice thing about getting your birthday presents before, on and after your birthday is that it's just one big long gift receiving season! I like it even more when some of the presents are in fact, cash. It's nice to be able to choose something you've wanted for a long time, something a bit different that isn't just store bought.


I've long admired Jennie's beautiful dolls, so much personality and detailed work in each one. I was also keen to get my hands on one of her beautiful stitched neck-pieces.


I love the bright colours in this one. Despite it's large proportions it's light weight to wear.


If a neck piece isn't your thing, Jennie also does some amazing brooches, hand drawn with free motion stitching and also some are hand painted.You can see a little bit of her process here. Beautiful works of art!

Buy handmade!

Friday, November 22, 2013

um ...


I've fallen off the handmade Christmas bandwagon *hangs head in shame*

I was lucky to win a box of Macarons from J'AIME LES MACARONS via the Mend and Make New Blog. I didn't want to eat them, they look so pretty right? But my family had different ideas. Salted caramel was the winner! I actually had a dream about them.

It's been crazy hot this week. I need it to rain. My garden is dry.

I'm counting down the last few weeks before my baby finishes preschool, seriously where did the last five years go?

I've been finding snippets of time to try this amazing product out, I'm excited with the results. I'll share more next week. It's been a while since I've been so excited with a craft product.

Hay fever is not my friend.

Motivation has eluded me over the past few weeks, I'm determined that next week will be different.

I'm working on some exciting things, just waiting for them all to fall into place so I can tell you all about it!

Happy weekend friends!

Tuesday, November 19, 2013

crochet a Christmas tree!


Here's a little pattern for a sweet little crochet Christmas tree, or a "pine" inspired tree if you will. They are quick and easy to make and use very little wool!

Crochet Christmas tree

You will need:
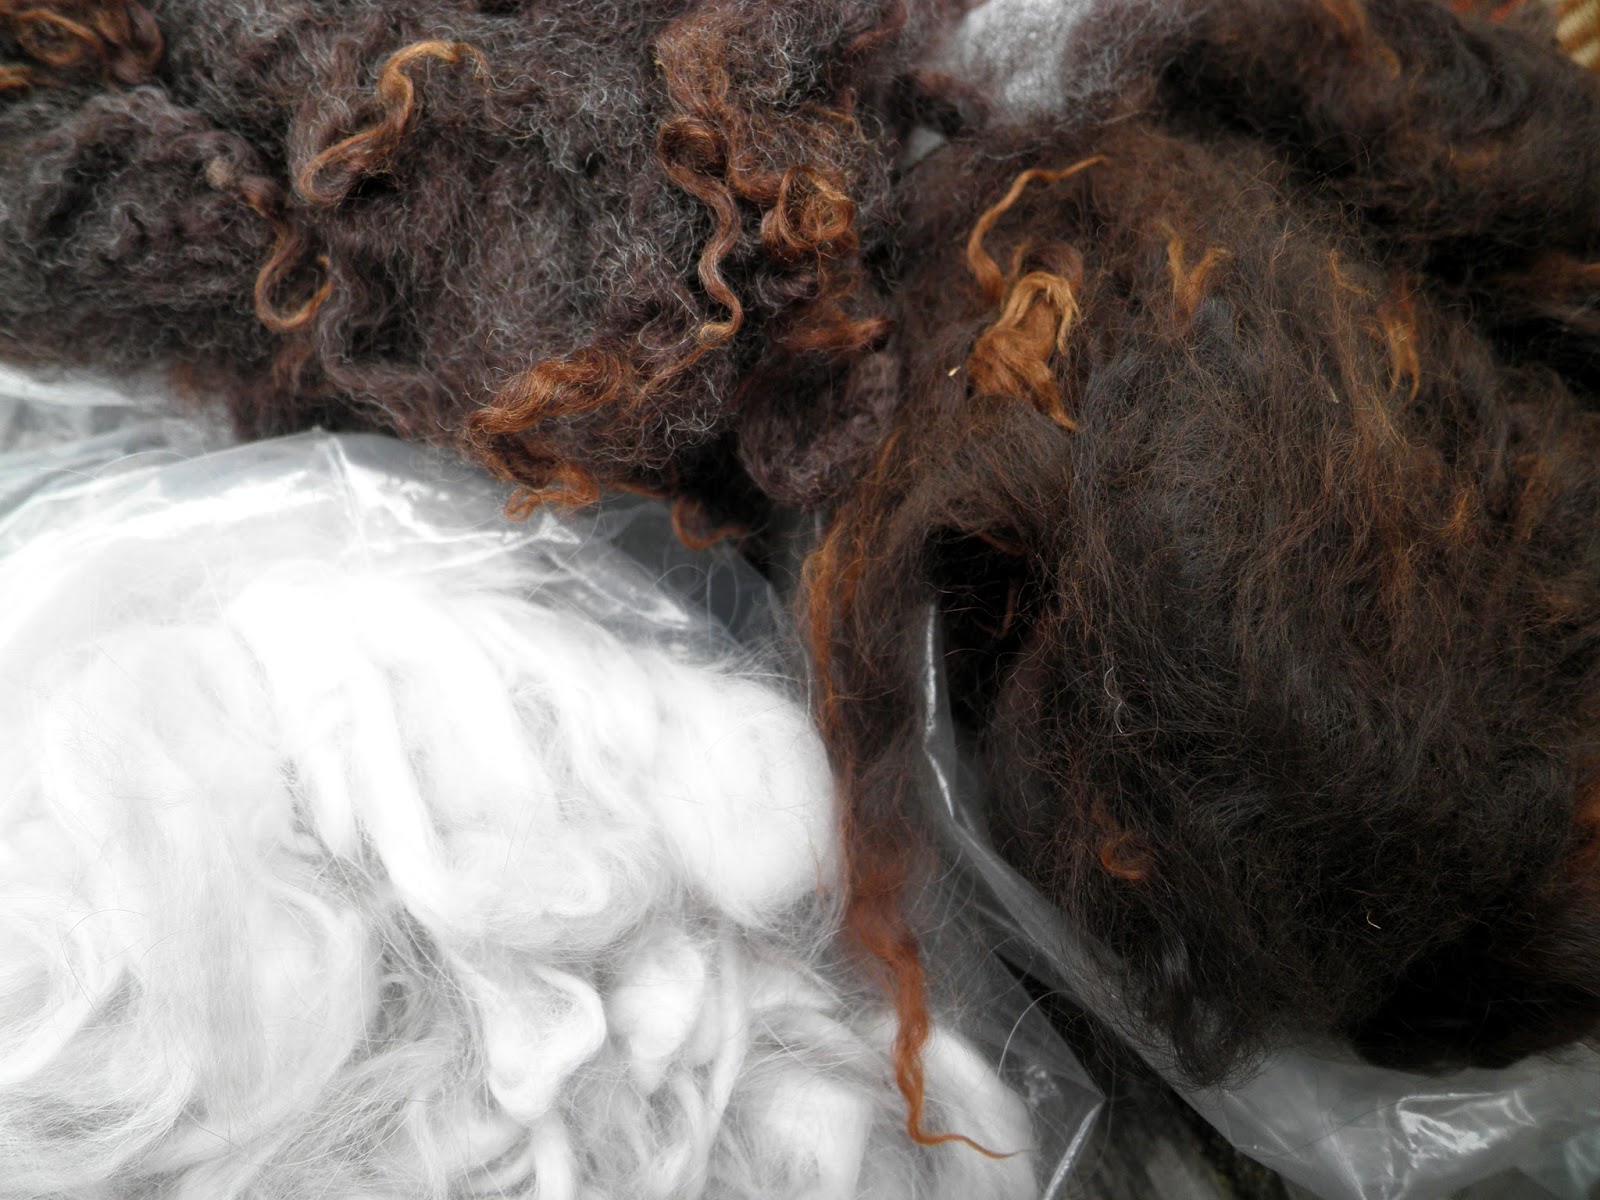
A small amount of yarn in green and brown. Also a contrast, a different green or for a snowy look, white!
Embroidery thread (optional)
3.5mm crochet hook (or hook of your choice to work with the yarn you like )
Small pom poms
Sewing thread
Felt (optional)

Note: Tree is worked from the top down.

Row 1: Ch 3 (counts as first dc, here and throughout the pattern) 2 dc in 2nd ch from hook (3 dc)
Row 2: Ch 2, 1 dc in same space as ch 2. 1 dc in next stitch, 2 dc in last stitch  (5 dc)
Row 3: Ch 2, 1 dc in same space as ch 2. 1 dc in next 3 stitches and 2 dc in last stitch (7 dc)
Row 4: (decreasing row) Ch 1, slip stitch in next 3 stitches. Ch 2, dc in same space. Dc in next stitch, 2 dc in next stitch. (5 dc)
Row 5: Repeat row 3 (7 dc)
Row 6: Ch 2, dc in same space as ch 2. Dc in the next 5 stitches, 2 dc in last stitch ( 9 dc)
Row 7: Ch 2, dc in same space as ch 2. Dc in the next 7 stitches, 2 dc in last stitch (11 dc)
Row 8: (decreasing row) Ch 1, slip stitch in next 3 stitches, Ch 2. Dc in same space as 2 ch. Dc in the next 4 stitches, 2 dc in the next stitch ( 8 dc)
Row 9: Ch 2, dc in same space as 2 ch. Dc in the next 6 stitches, 2 dc in the last stitch (10 dc)
Row 10: Ch 2, dc in the same space as 2 ch. Dc in the next 8 stitches, 2 dc in the last stitch (12 dc). Fasten off.


You'll end up with a shape similar to the one pictured above. I've used hand spun yarn so it's not perfectly even. Now it's time to add some contrast. This is done by attaching the chosen contrast yarn to one side of the "decreasing rows"

Ch 4, then insert your hook into the next stitch. Repeat along the width of the "decreasing rows" and also along the bottom of the last row. Use the photo below for reference. You could use embroidery thread for this or just a contrasting colour in the same weight yarn as the main part of your tree. Each row could be a different colour, like your tree is covered in tinsel! I particularly like the white for a snowy look.


The trunk is crocheted as follows:
Row1 :Ch 9, sc in 2nd ch from hook and in each stitch till the end.
Row 2: Ch 2, sc in each stitch till end. Repeat this row 2 more times.
Row 5: Fold the 4 rows in half and slip stitch the two long ends together. This creates a long tube. Fasten off leaving a long tail for stitching to the back of the tree.


Decorate your tree! Add mini pom poms, or sequins or any other little decorations. You might opt to leave your tree plain? It's up to you!

Stitch the trunk to the middle of  back of the tree! I wanted to make my hand spun go a long way so I stitched some felt to the back of the tree to cover up the trunk and the rest of the messy back. You might want to crochet a second tree and whip stitch them together?

Add some embroidery thread to the top with a needle and hang it on your tree! Or tie it on a gift. I'm planning on hanging these off the teacher presents this year.


One tree can look a little lonely, so why not crochet a forest of them!


I'd love to see your trees if you make any!

touring


I have at long last had the chance to stumble across this game on a thrifting outing, it was only a matter of time before I found one, I live in New Zealand afterall, but I have in fact been looking for several years! It's just the game I probably needed as a child (still do, just quietly) you see I have terrible knowledge of New Zealand geography, I'll blame it on my lack of local travel.


From Auckland to the Northern tip of the North Island I'm fine, below Taupo is where my knowledge dies. I've got the main centres locked in, but it's the little towns in between make me stop and wonder when I hear them mentioned in the news. Is that in the North Island? On the West or East coast? It's shameful and I'm not sure why I'm sharing this information with you. But there you go, now you can think less of me and my lack of geographical NZ knowledge.


Now my kids and I can play this game and learn a little bit about the location on some of the smaller New Zealand towns.


Like the town that my husband spent fond childhood years in and how he yearns to relocate us there.


Places I visited for the first time in my life earlier this year! Only problem is there isn't actually a map of New Zealand to locate all the places, so I might still be in the dark.

It's such a pretty game, to have it hidden away seems a shame. If I had a games/rumpus room I think I might do something like this with it, a cool idea don't you think?

Joining in with Max at Blackbird has spoken with the Op Shop Show Off!

Monday, November 18, 2013

spun


 A few weeks ago I had the pleasure of giving some preschool children a try of spinning wool. They were doing a unit on farm animals and spinning wool tied in nicely with that topic. I took in my wheel and a selection of different animal fibres for them to touch and have a try spinning with my hands guiding. I bought along some super soft Angora rabbit fibre and Alpaca and of course, some sheep wool too!


They were so excited and I enjoyed watching them feel the fibres, the Angora rabbit fibre was the biggest hit (it is SO soft!) with one little boy spending most of the day with his hand in the bag. As they did a little spinning with me, I wound the spun wool back off the bobbin so they had a little something to take home with them. That was the biggest hit, each of them proudly taking a little sample of their "work" home and showing their friends too. I was exhausted by the end of it all, how do teachers do it?

Wednesday, November 13, 2013

heads up!


Hey Aucklanders, this weekend sees the fabric hoarders collectors come out and offer you some of their stash for sale! I've had a stall at the last two Fabric-a-brac sales here in Auckland, but not this time. I can tell you first hand that there is an amazing array of new and vintage fabrics and accessories up for sale at these events. I'm so tempted to go along and add to my stash, but the cupboard under the stairs (and the pile in my bedroom/sewing space) says "no more!!" But surely you've got some more room for fabric???

Tuesday, November 12, 2013

progress


Time is ticking on by and my plans for a handmade Christmas are making really slow progress. I've ticked a few off my list, I printed off these beauties to make my list making a little easier. To take some of the pressure off (self induced pressure of course!)  I've taken part in some "online handmade buying"  from Felt, a New Zealand handmade website, there are some amazing handmade items for sale there.


I put the finishing touches on this cushion for a special person on my list. Each "petal" is in fact a small crocheted flower, I didn't bother counting them, there are lots! The leaves are cut from a tweedy woollen skirt, from a local thrift store, and the backing is more of the woollen blanket I used here.


Have you made any Christmas presents yet? Leaving it to the last minute? I'll be right there with you if that's the case - ah best laid plans eh?

rail


Over the weekend we took a special trip to Glenbrook Vintage Railway. Twice a year they have a special "Thomas" weekend where they put character faces on their trains. Characters from the Thomas books.


It's been around four years since we last attended a Thomas weekend, mr A was just a baby and now he's almost ready to start school! How on earth did that happen? I know my time where he is interested in trains with faces is coming swiftly to an end, made all the more obvious by the fact all the T-shirts that were for sale only went up to a size four.


We rode the trains, checked out their engine shed/workshop. Soaked up the sounds and views and talked about coal.


I loved the interior of the carriages, lovely woodwork and pressed tin ceilings. Not to mention the light fittings!


If you want to feel like you were there too? Click here to hear the sounds of the vintage railway.